

4.20.2009
ASPCA to Honour Martha
The American Society for the Prevention of Cruelty to Animals has selected Martha Stewart as the recipient of its Presidential Service Award. It will be presented to Martha by Ed Sayres, ASPCA president and CEO, at the 12th annual ASPCA Bergh Ball on Wednesday, April 23, at the Plaza Hotel in New York City. Martha was selected for embodying the values of the honour's purpose, Sayres noted. The award recognizes individuals who have made an ongoing commitment to animals and have gone above and beyond to support animal welfare and encourage awareness. Martha said: "My life has been greatly enriched by the many pets I have cared for over the years. I am deeply committed to the values the ASPCA embraces and am honoured to be receiving this award."

4.17.2009
The Kitchen Linens Book
She hung them on the line in a sun-dappled patch of lawn in the backyard: a whole row of them, waving like damp flags in the breeze. Tea towels, tablecloths, napkins - colourful in their embroidery and bold patterns, their stitches and their fringes. My grandmother always had fun kitchen linens and would collect at least one 'travel tea towel' on her trips to bring back home with her.
 I was so flattered when writer EllynAnne Geisel (author of The Apron Book and Apronisms) sent me a preview copy of her upcoming book, called The Kitchen Linens Book: Using, Sharing and Cherishing the Fabrics of Our Daily Lives. The book is a charming little history of kitchen linens, beautifully packaged in a slim, hardcover, cloth-bound volume that speaks to the tradition of vibrantly patterned and colourful kitchen linens. The book traces the history of the humble tea towel and the evolution of their designs, but strikes a warm chord by sharing the stories of kitchen-linen collectors and their passions for these soft, unassuming implements - as well as the family rituals of washing dishes, eating breakfast in the kitchen and making daily meals. It is a sweet examination of American kitchen traditions as much as it is a thorough discussion of the history of kitchen linens. Sprinkled througout the book are classic recipes, tips on washing dishes, caring for your tea towels (never wash or dry them with fabric softener since it will leave a residue on the fabric that will transfer to the dishes) and instructions on how to make your own kitchen linens.

 Some of the most beautiful and inventive kitchen linens can be found at Anthropologie. Their unique patterns, hommages to vintage designs and creative fringes are some of the best on the market today. (And, yes, I'm totally biased!) This one above is my latest buy.
 On my trip to Scotland in 2006, I collected a multitude of tea towels: a Scottish wildflower motif, a thistle motif and many others. This one above is my favourite. Its design is a collection of Scottish slang words and their definitions.
I was so flattered when writer EllynAnne Geisel (author of The Apron Book and Apronisms) sent me a preview copy of her upcoming book, called The Kitchen Linens Book: Using, Sharing and Cherishing the Fabrics of Our Daily Lives. The book is a charming little history of kitchen linens, beautifully packaged in a slim, hardcover, cloth-bound volume that speaks to the tradition of vibrantly patterned and colourful kitchen linens. The book traces the history of the humble tea towel and the evolution of their designs, but strikes a warm chord by sharing the stories of kitchen-linen collectors and their passions for these soft, unassuming implements - as well as the family rituals of washing dishes, eating breakfast in the kitchen and making daily meals. It is a sweet examination of American kitchen traditions as much as it is a thorough discussion of the history of kitchen linens. Sprinkled througout the book are classic recipes, tips on washing dishes, caring for your tea towels (never wash or dry them with fabric softener since it will leave a residue on the fabric that will transfer to the dishes) and instructions on how to make your own kitchen linens.
A very nice feature of the book is that it comes with a sheet of vintage butterick transfers in an envelope attached to the back cover of the book so that the reader can make her own patterns on a plain tea towel using the designs on the transfer paper:

COLOURFUL KITCHEN LINENS
Bright, beautiful kitchen linens got their start in the Depression. That's when even the wealthiest women, who were raised to oversee kitchen help, found themselves, out of necessity, doing all the cooking and cleaning themselves because they could no longer afford help. The better-off families had kitchens equipped with a few conveniences - a gas stove and a refrigerator, say - but most women faced an enormous task when it came to food preparation. Everything had to be prepared from scratch; you could buy a loaf of bread read-made, but little else. Women toiling over a hot stove or sink truly appreciated a bit of cheer in the way of vibrantly coloured and facifully designed dish towels.
And it wasn't just dish towels that took on colour and verve during the Depression. Tablecloths, too, became much more interesting as meals became less formal affairs. Dinner might still be served on the white damask in the dining room, but with Mother doing all the cooking and serving, it was inevitable that breakfast and lunch migrated to the kitchen - or more specifically, to a little room or alcove off the kitchen called the breakfast nook. The nook housed a square or gate-legged table that was surrounded by a couple of chairs or built-in benches. Conventional tablecloths would have been far too big for this cozy setup, so the breakfast cloth was invented.
A WORD ON FINISHING
Linen, cotton or linen/cotton blend towels that are bleached tend to be softer and more absorbent than their unbleached counterparts, but they will wear out faster, as bleaching compromises fibre strength. Beacause fabric sizing, excess dye and fabric softener all impair absorbency, always wash a new batch of tea towels before using them.
Some of the most beautiful and inventive kitchen linens can be found at Anthropologie. Their unique patterns, hommages to vintage designs and creative fringes are some of the best on the market today. (And, yes, I'm totally biased!) This one above is my latest buy.On my trip to Scotland in 2006, I collected a multitude of tea towels: a Scottish wildflower motif, a thistle motif and many others. This one above is my favourite. Its design is a collection of Scottish slang words and their definitions. 4.11.2009
Spring Menu for Six
I came across this excellent spring menu for six in Canada's Food & Drink magazine, a free catalog distributed in Ontario by the Licquor Control Board of Ontario in their stores. I was so dazzled by the freshness and lightness of the flavours that I decided to share it on Martha Moments. If anyone indulges in the following recipes, please write to let me know how they turned out.
TOMATO AND BEET YOGURT SOUP

The beets give this soup a wonderfully earthy taste, which is reminiscent of borscht. A nice complementary garnish is chopped dill. The serving sizes are small.
2 tblsp olive oil or vegetable oil
1/4 cup chopped celery
1/2 cup chopped white onion
1/4 cup chopped carrot
1 small red beet, peeled and grated
1 clove garlic, chopped
1 tblsp tomato paste
4 tomatoes, chopped
1 1/2 cups chicken stock
Salt to taste
1/4 cup yogurt
1. Place oil in a pot over medium heat, add celery, onion, carrot, beets and garlic. Cook gently until translucent, about 5 minutes.
2. Add tomato paste and cook for 1 minute, then add chopped tomatoes and cover, cook for 4 to 5 minutes. Add chicken stock and salt. Bring soup to a boil, reduce heat and simmer for 15 minutes. Remove from heat and cool.
3. Place soup in a blender and add yogurt. Strain soup through a fine strainer to remove seeds and tomato skins. Serve hot or cold. Serves 4 to 8, depending on size of serving vessel.
SHRIMP SUSHI PARFAIT

This dish uses all the flavours of sushi in a different presentation. It can be made up to 4 hours in advance and refrigerated.
1 cup sushi rice
1 1/2 cups water
2 tblsp rice wine vinegar
1/2 tsp sugar
1 tsp salt
1 ripe avocado
2 tbsp sour cream
1 lime, juiced
2 cups cooked baby shrimp
1 tsp grated ginger
1/4 cup red onion finely diced
1/4 cup red pepper, finely diced
1/2 cup yellow pepper, finely diced
1 tbsp chopped coriander
1 lime, juiced
1 tsp sesame oil
1 sheet of Nori for garnish
6 cooked shrimp for garnish
1. Place rice in a strainer and rinse rice until the water runs clean. Place rice and water in a medium pot and place on high heat. Place a lid on the pot and when liquid comes to a boil turn down to a simmer. SImmer until all the water is absorbed, about 15 minutes. Remove pot from the heat and let stand 10 minutes, covered. Place rice in a bowl and add the rice wine vinegar, sugar and salt.
2. Peel avocado and remove pit. Either mash or puree with a food processor. Stir in the sour cream and squeeze in some lime juice. Season with salt.
3. Roughly chop the shrimp. In a small bowl combine shrimp, ginger, red, onion, red pepper, yellow pepper, coriander, lime juice and semsame oil. Mix to combine.
4. Into 6 clear glasses, place 1 tbsp of the shrimp mixture, followed by a layer of the avocado mousse followed by a layer of the sushi rice. Continue until all the ingredients are used up, preferably with the shrimp as a last layer. Top each with a few piece of julienned Nori and a large shrimp.
POACHED SALMON WITH GREEN TEA SOBA NOODLES AND CUCUMBER SALAD
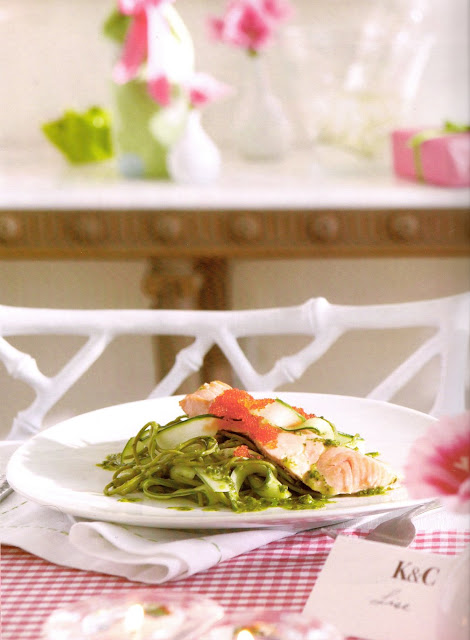 Sold in small jars, tobiko is a Japanese word for flying fish roe. It is typically used in certain sushi dishes such as California Rolls.
1 carrot, roughly chopped
1 piece of celery, roughly chopped
1 white onion, roughly chopped
1 bay leaf
1 clove of garlic
1/2 lemon
8 cups water
6 salmon fillets
1 bunch coriander, washed and chopped
2 tsp grated lime rind
1/4 cup rice wine vinegar
3/4 cup vegetable oil
2 tbsp semsame oil
2 tbsp brown sugar
Salt
1 package green tea soba noodles or spinach fettuccine
1 English cucumber, de-seeded and sliced thinly with a vegetable peeler
1 bunch scallions, sliced finely
Tobiko for garnish
1. Place carrot, celery, onion, bay leaf, garlic and lemon into a medium pot with 8 cups of water. Gently bring to a simmer. Simmer for for 10 minutes and remove from heat. Let stand another 10 minutes and strain or remove vegetables, saving the liquid.
2. Bring the liquid back to a simmer and place the salmon pieces into the broth. Gently poach until desired doneness, 5 to 6 minutes, depending on thickness of fillets.
3. Place coriander, ginger, lime rind, rice wine vinegar, vegetable oil, sesame oil , brown sugar and salt into a blender and blend until smooth.
4. Cook green tea soba noodles or spinach fettuccini as directed on package. When done, toss with 1/2 cup of the coriander and lime vinaigrette, 1/2 the cucumber and scallions.
5. To plate, place 1 cup of green tea soba noodles in the center of the dish, top with a poached fillet of salmon. Place a reserved cucumber curl on top for garnish and drizzle the coriander vinaigrette lightly over the fish. Garnish with tobiko. Serves 6.
PISTACHIO POTS DE CREME

The pistachios add a rich creaminess to this dessert and lend it their pale green colour.
3 cups 35% cream
1 tbsp vanilla extract
1/2 cup shelled green pistachios
6 large yolks
1/2 cup sugar
1. Pour the heavy cream, vanilla and pistachios into a pot and place over medium heat. Bring the cream to a simmer, do not boil. In a large bowl, whisk together egg yolks and sugar until the sugar dissolves and the mixture is a lemon colour. Temper the yolks by gradually whisking in the hot cream into the yolk and sugar mixture. Do not add the hot cream too quickly or the eggs will cook. Place mixture into a blender and puree until smooth. Pass the mixture through a fine strainer.
2. Preheat over to 350 degrees.
3. Pour the mixture into six 8-oz ramekins, filling them three-quarters of the way up. Fill a large shallow baking pan with 1/2 inch warm water. Carefully place the ramekins in the water bath and bake for about 35 minutes; the centre should just wiggle slightly. Remove the pan from the oven and let the ramekins cool in the water for about 10 minutes. Then put them in the refrigerator for at least 2 hours to chill. Serves 6.
UPSIDE DOWN RHUBARB MINI-CAKES
 These cute cakes are baked in a muffin tin to create individual desserts for your guests. You may substitue the rhubarb for peach or apple with the same great results.
1/2 cup unsalted butter
3/4 cup granulated sugar
2 large eggs
1 tbsp vanilla extract
1 cup all-purpose flour
1 tbsp baking powder
Pinch of salt
2 cups chopped rhubarb
1 1/4 cups brown sugar
1. Preheat oven to 350 degrees.
2. Beat the butter and sugar until creamed, about two minutes. Add eggs 1 at a time until well blended, add vanilla. Beat in flour, baking powder and salt and beat until combined.
3. Butter a 12-cup muffin tin.
4. In each muffin tin distribute evenly the chopped rhubarb and 1 1/2 tbsp brown sugar. Place 1 heaping teaspoon of the batter in each tin. Place in oven and bake for about 40 minutes, or until light golden on top. Cool and turn out.
5. Serve with whipped cream or vanilla ice cream. Serves 6.
TOMATO AND BEET YOGURT SOUP
The beets give this soup a wonderfully earthy taste, which is reminiscent of borscht. A nice complementary garnish is chopped dill. The serving sizes are small.
2 tblsp olive oil or vegetable oil
1/4 cup chopped celery
1/2 cup chopped white onion
1/4 cup chopped carrot
1 small red beet, peeled and grated
1 clove garlic, chopped
1 tblsp tomato paste
4 tomatoes, chopped
1 1/2 cups chicken stock
Salt to taste
1/4 cup yogurt
1. Place oil in a pot over medium heat, add celery, onion, carrot, beets and garlic. Cook gently until translucent, about 5 minutes.
2. Add tomato paste and cook for 1 minute, then add chopped tomatoes and cover, cook for 4 to 5 minutes. Add chicken stock and salt. Bring soup to a boil, reduce heat and simmer for 15 minutes. Remove from heat and cool.
3. Place soup in a blender and add yogurt. Strain soup through a fine strainer to remove seeds and tomato skins. Serve hot or cold. Serves 4 to 8, depending on size of serving vessel.
SHRIMP SUSHI PARFAIT
This dish uses all the flavours of sushi in a different presentation. It can be made up to 4 hours in advance and refrigerated.
1 cup sushi rice
1 1/2 cups water
2 tblsp rice wine vinegar
1/2 tsp sugar
1 tsp salt
1 ripe avocado
2 tbsp sour cream
1 lime, juiced
2 cups cooked baby shrimp
1 tsp grated ginger
1/4 cup red onion finely diced
1/4 cup red pepper, finely diced
1/2 cup yellow pepper, finely diced
1 tbsp chopped coriander
1 lime, juiced
1 tsp sesame oil
1 sheet of Nori for garnish
6 cooked shrimp for garnish
1. Place rice in a strainer and rinse rice until the water runs clean. Place rice and water in a medium pot and place on high heat. Place a lid on the pot and when liquid comes to a boil turn down to a simmer. SImmer until all the water is absorbed, about 15 minutes. Remove pot from the heat and let stand 10 minutes, covered. Place rice in a bowl and add the rice wine vinegar, sugar and salt.
2. Peel avocado and remove pit. Either mash or puree with a food processor. Stir in the sour cream and squeeze in some lime juice. Season with salt.
3. Roughly chop the shrimp. In a small bowl combine shrimp, ginger, red, onion, red pepper, yellow pepper, coriander, lime juice and semsame oil. Mix to combine.
4. Into 6 clear glasses, place 1 tbsp of the shrimp mixture, followed by a layer of the avocado mousse followed by a layer of the sushi rice. Continue until all the ingredients are used up, preferably with the shrimp as a last layer. Top each with a few piece of julienned Nori and a large shrimp.
POACHED SALMON WITH GREEN TEA SOBA NOODLES AND CUCUMBER SALAD
Sold in small jars, tobiko is a Japanese word for flying fish roe. It is typically used in certain sushi dishes such as California Rolls. 1 carrot, roughly chopped
1 piece of celery, roughly chopped
1 white onion, roughly chopped
1 bay leaf
1 clove of garlic
1/2 lemon
8 cups water
6 salmon fillets
1 bunch coriander, washed and chopped
2 tsp grated lime rind
1/4 cup rice wine vinegar
3/4 cup vegetable oil
2 tbsp semsame oil
2 tbsp brown sugar
Salt
1 package green tea soba noodles or spinach fettuccine
1 English cucumber, de-seeded and sliced thinly with a vegetable peeler
1 bunch scallions, sliced finely
Tobiko for garnish
1. Place carrot, celery, onion, bay leaf, garlic and lemon into a medium pot with 8 cups of water. Gently bring to a simmer. Simmer for for 10 minutes and remove from heat. Let stand another 10 minutes and strain or remove vegetables, saving the liquid.
2. Bring the liquid back to a simmer and place the salmon pieces into the broth. Gently poach until desired doneness, 5 to 6 minutes, depending on thickness of fillets.
3. Place coriander, ginger, lime rind, rice wine vinegar, vegetable oil, sesame oil , brown sugar and salt into a blender and blend until smooth.
4. Cook green tea soba noodles or spinach fettuccini as directed on package. When done, toss with 1/2 cup of the coriander and lime vinaigrette, 1/2 the cucumber and scallions.
5. To plate, place 1 cup of green tea soba noodles in the center of the dish, top with a poached fillet of salmon. Place a reserved cucumber curl on top for garnish and drizzle the coriander vinaigrette lightly over the fish. Garnish with tobiko. Serves 6.
PISTACHIO POTS DE CREME
The pistachios add a rich creaminess to this dessert and lend it their pale green colour.
3 cups 35% cream
1 tbsp vanilla extract
1/2 cup shelled green pistachios
6 large yolks
1/2 cup sugar
1. Pour the heavy cream, vanilla and pistachios into a pot and place over medium heat. Bring the cream to a simmer, do not boil. In a large bowl, whisk together egg yolks and sugar until the sugar dissolves and the mixture is a lemon colour. Temper the yolks by gradually whisking in the hot cream into the yolk and sugar mixture. Do not add the hot cream too quickly or the eggs will cook. Place mixture into a blender and puree until smooth. Pass the mixture through a fine strainer.
2. Preheat over to 350 degrees.
3. Pour the mixture into six 8-oz ramekins, filling them three-quarters of the way up. Fill a large shallow baking pan with 1/2 inch warm water. Carefully place the ramekins in the water bath and bake for about 35 minutes; the centre should just wiggle slightly. Remove the pan from the oven and let the ramekins cool in the water for about 10 minutes. Then put them in the refrigerator for at least 2 hours to chill. Serves 6.
UPSIDE DOWN RHUBARB MINI-CAKES
These cute cakes are baked in a muffin tin to create individual desserts for your guests. You may substitue the rhubarb for peach or apple with the same great results.1/2 cup unsalted butter
3/4 cup granulated sugar
2 large eggs
1 tbsp vanilla extract
1 cup all-purpose flour
1 tbsp baking powder
Pinch of salt
2 cups chopped rhubarb
1 1/4 cups brown sugar
1. Preheat oven to 350 degrees.
2. Beat the butter and sugar until creamed, about two minutes. Add eggs 1 at a time until well blended, add vanilla. Beat in flour, baking powder and salt and beat until combined.
3. Butter a 12-cup muffin tin.
4. In each muffin tin distribute evenly the chopped rhubarb and 1 1/2 tbsp brown sugar. Place 1 heaping teaspoon of the batter in each tin. Place in oven and bake for about 40 minutes, or until light golden on top. Cool and turn out.
5. Serve with whipped cream or vanilla ice cream. Serves 6.
4.10.2009
Brent's Apartment Therapy
Brent Ridge, a friend of MSL Radio (and a friend of mine!), used the Apartment Therapy 8 Step Home Cure in renovating his apartment in Manhattan. For four Mondays in April on Whole Living (live 10 am ET/7 am PT on Sirius 112 and XM 157), Martha Stewart Living and Apartment Therapy will be bringing listeners/readers ideas on doing a renovation, decorating their homes, making rooms as comfortable and functional as they are stylish, and even on entertaining at home. Be sure to check the Whole Living website for listings.
The Martha Stewart Living Radio Blog now has a complete slideshow of the renovation process, so be sure to check it out. Below I have some of the photos of the finished apartment. I asked Brent about the renovation:
"We lived in our apartment for 5 years while it was literally falling down around us. Several good things came out of the experience (and one REALLY good thing). Living in the space for so long before starting the renovation enabled us to really put some thought into what needed to be adapted to make the apartment more functional for us. Because the apartment was completely ruined by flooding, by necessity, it was a gut renovation which enabled us to bring in more environmentally sound building materials than we may have been able to if the project had been on a smaller scale."
 A view of the entranceway from the living room.
 The entrance has lots of hidden storage and a built-in table for working or dining.

The Martha Stewart Living Radio Blog now has a complete slideshow of the renovation process, so be sure to check it out. Below I have some of the photos of the finished apartment. I asked Brent about the renovation:
"We lived in our apartment for 5 years while it was literally falling down around us. Several good things came out of the experience (and one REALLY good thing). Living in the space for so long before starting the renovation enabled us to really put some thought into what needed to be adapted to make the apartment more functional for us. Because the apartment was completely ruined by flooding, by necessity, it was a gut renovation which enabled us to bring in more environmentally sound building materials than we may have been able to if the project had been on a smaller scale."
A view of the entranceway from the living room. The entrance has lots of hidden storage and a built-in table for working or dining.
The kitchen is attractively designed with dark woods and low lighting, creating an inviting space. Leading into the kitchen is a display cabinet for glassware.
 The bedroom was once blue and grey. It's now found a more comfortable pallette in hues of brown and taupe.
 A beautiful hutch in the bedroom.
 Clean lines and cool tones for the bathroom.
Below are some photos of the interior of the Beekman mansion in Sharon Springs, New York. These were first published in the New York Times. Be sure to check out the May issue of Vanity Fair for another feature on Brent and Josh - "Hot Young Farmers!"
 The living room is painted a sunny yellow.
 An expansive kitchen is ideal for entertaining.
Leading into the kitchen is a display cabinet for glassware. The bedroom was once blue and grey. It's now found a more comfortable pallette in hues of brown and taupe. A beautiful hutch in the bedroom. Clean lines and cool tones for the bathroom.
"Everyone who knows Josh and me knows that we like to entertain. For at least three years, we were completely unable to have guests safely in our home. As a result, we were able to save a lot of money which ultimately became the down payment on The Beekman Farm. Perhaps it is true that everything happens for a reason."
Below are some photos of the interior of the Beekman mansion in Sharon Springs, New York. These were first published in the New York Times. Be sure to check out the May issue of Vanity Fair for another feature on Brent and Josh - "Hot Young Farmers!"
The living room is painted a sunny yellow.An expansive kitchen is ideal for entertaining.4.06.2009
Country Living at Kmart
A new home furnishings line named after Country Living magazine will debut this summer in Kmart and Sears stores across the country. With Martha Stewart's Everyday brand of home products leaving the Kmart shelves in 2010, the new Country Living line appears to be poised to replace it.

Two corner cupboards replicating 18th Century originals made by the designers at Country Living. The new Country Living line of home furnishings will be available at Kmart stores this spring.
The new line will include furniture, tabletop, bedding and bath items. Items will range from $3.99 for candles to $349 for dining room furniture - similar price points to the Everyday line. Jaclyn Smith also launched a home line at Kmart last fall, ostensibly in an effort to personalize Kmart with a well-known spokesperson for the home division in lieu of Martha's departure.
Martha Stewart Living has not yet announced the mass-market retailer that will distribute its bestselling Everyday brand but it has confirmed it is in talks with a well-known store and is close to finalizing a deal.
Two corner cupboards replicating 18th Century originals made by the designers at Country Living. The new Country Living line of home furnishings will be available at Kmart stores this spring.
4.03.2009
So Eggceptional!
The beauty of Martha's holiday crafts always leave me a bit speechless - not only because I'm never quite sure how the projects are completed in such bounty and perfection (despite the instructions) but also because they are so splendidly arranged, styled and photographed in the pages of the magazine. I decided to highlight some of my favourite Easter-egg crafts. Many of them are from the recent April issue, which I think beautifully conveys the artistry and imagination involved in holiday crafts. (Note to the Martha Stewart Living editors: I'm still waiting for a special spring "Holiday" issue. I even took it upon myself to design a prospective cover for the glossy, which you can see below.)
 Multicoloured and speckled eggs are nestled in fern fronds in hurricane vases. I enjoy the symmetry of the display, offset by the stray fern at the base of the vase on the right: a lovely spring vignette.
 The 2009 April issue has a vast collection of decoupage egg projects, which you can see above and below. Eggs of various sizes are dyed or painted and then decorated with precisely cut-out images of flowers and birds, glued onto the shells.
 Egg-shaped boxes are painted and speckled and then decorated with butterfly and rabbit cut-outs. I like that some of the butterfly 'specimens' are not entirely glued down to the box; their wings are left to flutter, creating a sense of depth through shadow.
 Plain silhouettes of chicks, roosters, bunnies and flowers decorate these eggs and egg-shaped boxes.
 This one is kind of over-the-top, with its huge emu egg nestled on a bed of potted flowers. The arrangement is given perspective and creative weight when paired with a similar nest of pheasant eggs.
 A simple white bowl is given a nest-like appearance by wrapping it in angora (top left); two cake stands are arranged with egg-cup nosegays of yellow toned flowers (top right); A chocolate cake is decorated with a nest of chocolate shavings and white-chocolate eggs dyed robin's-egg blue with food colouring (bottom left); hollow egg shells are sterilized in boiling water and then piped full of warm liquid chocolate, which solidifies when cooled. The eggs can be cracked, peeled and enjoyed (bottom right).
 Multicoloured and speckled eggs are nestled in fern fronds in hurricane vases. I enjoy the symmetry of the display, offset by the stray fern at the base of the vase on the right: a lovely spring vignette.
 The 2009 April issue has a vast collection of decoupage egg projects, which you can see above and below. Eggs of various sizes are dyed or painted and then decorated with precisely cut-out images of flowers and birds, glued onto the shells.
 Egg-shaped boxes are painted and speckled and then decorated with butterfly and rabbit cut-outs. I like that some of the butterfly 'specimens' are not entirely glued down to the box; their wings are left to flutter, creating a sense of depth through shadow.Plain silhouettes of chicks, roosters, bunnies and flowers decorate these eggs and egg-shaped boxes.
 This one is kind of over-the-top, with its huge emu egg nestled on a bed of potted flowers. The arrangement is given perspective and creative weight when paired with a similar nest of pheasant eggs.A simple white bowl is given a nest-like appearance by wrapping it in angora (top left); two cake stands are arranged with egg-cup nosegays of yellow toned flowers (top right); A chocolate cake is decorated with a nest of chocolate shavings and white-chocolate eggs dyed robin's-egg blue with food colouring (bottom left); hollow egg shells are sterilized in boiling water and then piped full of warm liquid chocolate, which solidifies when cooled. The eggs can be cracked, peeled and enjoyed (bottom right).
Subscribe to:
Posts (Atom)