5.08.2009

Mother's Day Craft

On page 129 of Martha Stewart's Encyclopedia of Crafts, you will learn how to punch flowers out of fabric - something I've never done, nor considered doing until I read about how simple the process is. The crafts below are perfect for handmade Mother's Day gifts and cards. Best of all - there's still time! These projects don't take very long to complete and the materials needed are minimal.

How to Punch Fabric Flowers:

1. Lay a piece of fabric in a shallow tray. With a medium paintbrush, apply enough fabric stiffener to saturate, but not soak, the material. Let it dry - about one hour. Repeat with all remaining fabric.

2. Punch out petals and leaves as close together as possible on the fabric using a store-bought floral-shaped punch, available at craft stores. The petals will be stiff enough to work with, layering and manipulating the shapes into three-dimensional creations.
These bouquets of fabric flowers are everlasting and memorable. These ones include pink violets, blue hydrangeas and purple-and-gold panises. To make this project you'll need the fabric, the stiffener, the punch, floral pips, contact cement, floral wire and floral tape, as well as the vessels you plan to place the bouquets in. Punch fabric flowers. Using a micro hole punch, make a hole in the center of each flower. Slip a pip through each hole and secure it with a dab of contact cement. To make a stem, cut a length of floral wire and wrap it around each pip with green floral tape. For leaves, glue flroal wire to each one to create veins and stems. Wrap the stems with floral tape. Gather blooms and leaves into a bouquet and either tuck them into in a vase or wrap the stems with more floral tape to join them, then decorate with fabric ribbon.
An array of petals and leaves appears to sprout out from this handmade greeting card. Surprise your mom with a card depicting her favourite flowers. For this project you'll need the basic fabric-punching supplies, cards, a pen, an envelope, white craft glue, ribbon and double-sided glue dots. Punch the fabric flowers and leaves using the decorative punches. Glue just the centers of the leaves and flowers to a card so their tips curl upward a little. Use different colours of fabric and different-shaped flowers to make a vibrant bouquet. Layer the leaves first and place the smallest flowers last, gluing the flowers in place as you work. Draw the stems using a coloured pen or pencil. With a double-sided glue dot, affix a knotted ribbon on top of the stems as a bow.
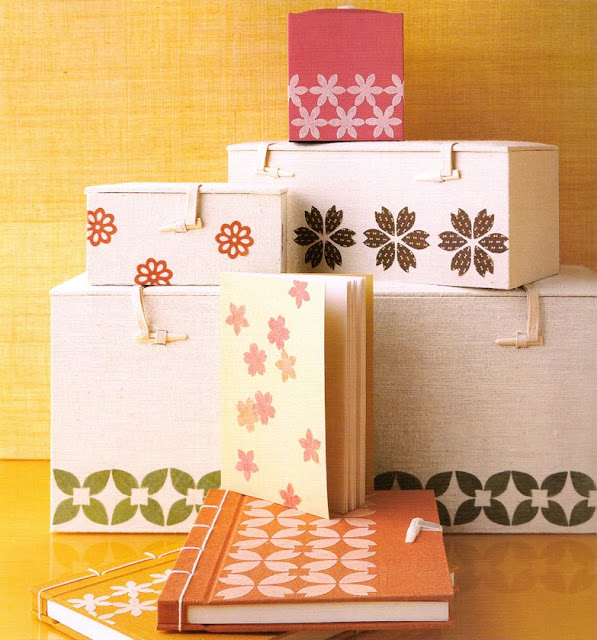
Floral fabric cutouts can also be used to decorate fabric-covered journals and boxes. Punch out the flowers as usual. Lay out your design before beginning to affix the flowers to the object. For a linear pattern, use a grid ruler as a guide to keep your lines straight. Apply the petals or flowers with a glue stick; make sure to cover the back of each shape completely with the adhesive to prevent curling.

June's beachy beauty

The June issue of Martha Stewart Living arrived in my mailbox yesterday, and its lean size actually speaks volumes about its breezy content. Beach houses, seaside printing projects and light, airy recipes perfect for those warm days by the water fill this little issue. I had rated last June's issue as the worst of 2008, but this year's June offering is a delight.
The cover has a fresh, summery vibe - the living room of a Long Island summer home by the sea.
The bedroom in the same home begs for a 20-minute cat nap between swims.
The mud room of the house is all set for outdoor play, stocked wtih beach towels and flip-flops.
My favourite feature is an article on using sea-themed patterns in printing projects for summer. Above, a pink sarong is splashed with starbursts in a darker shade of rose using starfish as the stamping mechanism.
The starfish pattern is repeated here in blue on a child's white t-shirt.
Using resin and plastic fish forms, create a wall-mounted aquarium of colourful prints on rice paper.
Beautiful seashell patterns on an assortment of cool-coloured pillows and cushions lend a nautical touch to this lounge-friendly nook.
Whether you roll it up and place it in a time-worn glass bottle to be tossed into the ocean, or send them the usual route, your own personal stationery can evoke the feel of a pebbled beach by laying beach stones or shells on paper and spraying the area with watered-down paint in cool shades of blue.

Green Entertaining

In the spring issue of Martha Stewart Weddings there is a beautiful spread on green-and-white palettes for spring or summer weddings. What I love about Martha Stewart Weddings, and what I'm sure the editors already realize, is that the content can be so easily applied to any special occasion or larger-scale event: anniversaries, milestone birthdays or graduation dinners. Below are some of the beautiful examples of how the editors took green and white and created an environment of cool, summery elegance.
The criss-crossed ribbon on the table creates a lovely lattice pattern, evocative of a garden trellice. Ruffled hydrangeas and vibernum look like a hedgerow in this arrangement. Grace Collection glasses and Martha Stewart Wedgwood on the tabletop.
When you choose a single colour to anchor your tablescape, you can blend different china patterns. The natural motifs make these designs even more interchangeable. The bamboo pattern calls to mind a tropical locale, and the abstract leaves are softened by the organic lines of the vines they grow on. A touch of formality comes from the gold-edged and fluted rims of overlapping scales.
Cuccumber and asparagus sandwiches, made with herbed cream cheese, are the perfect tea-time accompaniment at a spring brunch.
Send beautiful invitations to your spring party that match the colour scheme of your event-to-be. These are by Kerry Doyle for Minted.com.
This bouquet was obviously designed for a lucky bride, but placed in a McCoy vase they would be a beautiful addition to a side table or used as a centerpiece. (The white dragon fly is a whimsical touch, available at floraltrims.com.)
Wedding favours could just as easily be turned into parting gifts for a graduation party or 40th birthday party. The tags come in four different patterns and can be downloaded at marthastewartweddings.com/spring-green-tags.

5.03.2009

Lawrence Park

Lawrence Park, located in Toronto, just minutes from the downtown core of the city, is the area I call home. One of the deciding factors in choosing to live in this area of the city before I moved was the beautiful surroundings. It's an older, established neighbourhood loaded with charm. Now that it's spring, the park across the street from my apartment is bursting at the seams with blooms and buds. I thought I'd share some of the season's early offerings.

The entrance to Lawrence Park is lined with a long row of tulips and a small, well-trimmed hedge.
The tulips are so fragrant and beautiful.
These tiny blossoms were humming with bees.
A bank of rhododendrons lines a stone staircase leading to one of many pathways.
The only one of its kind in the whole park: a towering beauty.
Holly grows in the park, too - something to remember come Christmas.... (shhhh)
A joyful, yellow vignette of tulips and forsythia.
This wigela was already packed with blooms.
A view of the park, which looks lush and inviting.
At the center of the park is a formal garden that has not yet bloomed. I'm told it will be full of peonies and roses come June and that many newlyweds have their photos taken here.
The magnolia trees in the nearby neighbourhood wasted little time in blooming.

Adjacent to the park are several older homes. Many of them are stately, unique examples of modernity. This one above reminds me of an old plantation, yet it's situtated practically downtown - a wonderful contrast of context.
Nothing says Canada like a house with a moose on the roof! This one is carved out of wood and the owner of the house has it illuminated at night with small spotlights: strange and wonderful.

4.30.2009

Outdoor Rooms

A room under a canopy of whispery leaves where the sun dapples through cool shadows and where birds sing all around you. A room whose walls are laden with vines or espaliered shrubs, where the carpet is pebble or moss or grass - no vacuuming required.

Outdoor rooms have become something of a 'must-have' for homeowners who love their backyards. They are places of hidden refuge amid the more public zones of the outdoor spaces, tucked behind hedges, gates, or fences, or contained within a series of ceiling-less walls.

Since I do not have a yard, I now find myself pining for one of those outdoor rooms to escape to, especially with the weather warming up and the leaves popping out of every branch on every tree. Below I've compiled a series of some of my favourite outdoor rooms - ones I can only access by sight and imagination, but nonetheless alluring.

Outdoor rooms do not have to be elaborate. This one above is charming and simple, contained within a wall of vines and potted plants. Designating a 'room' outdoors requires only a few simple elements:
  • A well-defined zone made more prominent by a differing groundcover or separated from the rest of the outdoor spaces by hedges, steps, pathways, fences or walls. It should be a destination.
  • A function: a dining area, a sitting area, a reading area or an activity area. The 'room' should serve a purpose.
  • Furniture: be it a dining table or a series of outdoor seats, the room needs its fixtures.

This outdoor sitting area in a yard in Vancouver is accessed from the house by a flight of stone steps, sunken in an area defined by a flagstone floor.
In the same yard, an outdoor dining room is located in a different section.
Another home in Vancouver, this one is designed for daytime or nighttime entertaining with its large gas fireplace. Note the adjacent dining area just a few steps away. With functional and well-equipped spaces like these, there is no excuse to miss a fine summer day.
In the same space, a wall contains a trio of fountains offering a natural introduction of outdoor atmosphere.
Martha's home in Bedford has several outdoor rooms. This one is located near her main residence. She is in the midst of building another outdoor room next to her summer house on the same property, a room that will be defined by 9-foot tall walls of emerald boxwood.

4.29.2009

10 Pom-Pom Good Things

The big, beautiful pom-poms by Martha Stewart Crafts at Michael's craft shop come in a rainbow of sorbet-inspired colours. Below are some tips on using pom-poms for all kinds of special occasions:

1. Hang pom-poms over a dining room table using monofilament (fishing wire) for a festive look.

2. Hang them on the sides or backs of seating along a wedding aisle.

3. Place them on top of presents instead of a bow for an oversized and unexpected look.

4. Create flower-like blooms by layering two pieces of green tissue on the bottoms of the pink tissue when assembling the pom-poms.

5. Place them on top of wide brim vases and position them at the end of a buffet table.

6. Position three white pom-poms together to make a snowman.

7. Hang on the backs of chairs at a celebratory dinner party.

8. Hang with ribbon or streamers in an entranceway when hosting a birthday party.

9. Hang from low tree branches or along the railings of a deck for an outdoor celebration.

10. Unfold only one half of the pom-pom and place them flat-side-down on a table to be used as a centerpiece.


SorbetLattice Heart Camellia